Saturday, July 31, 2010

Packing is a party


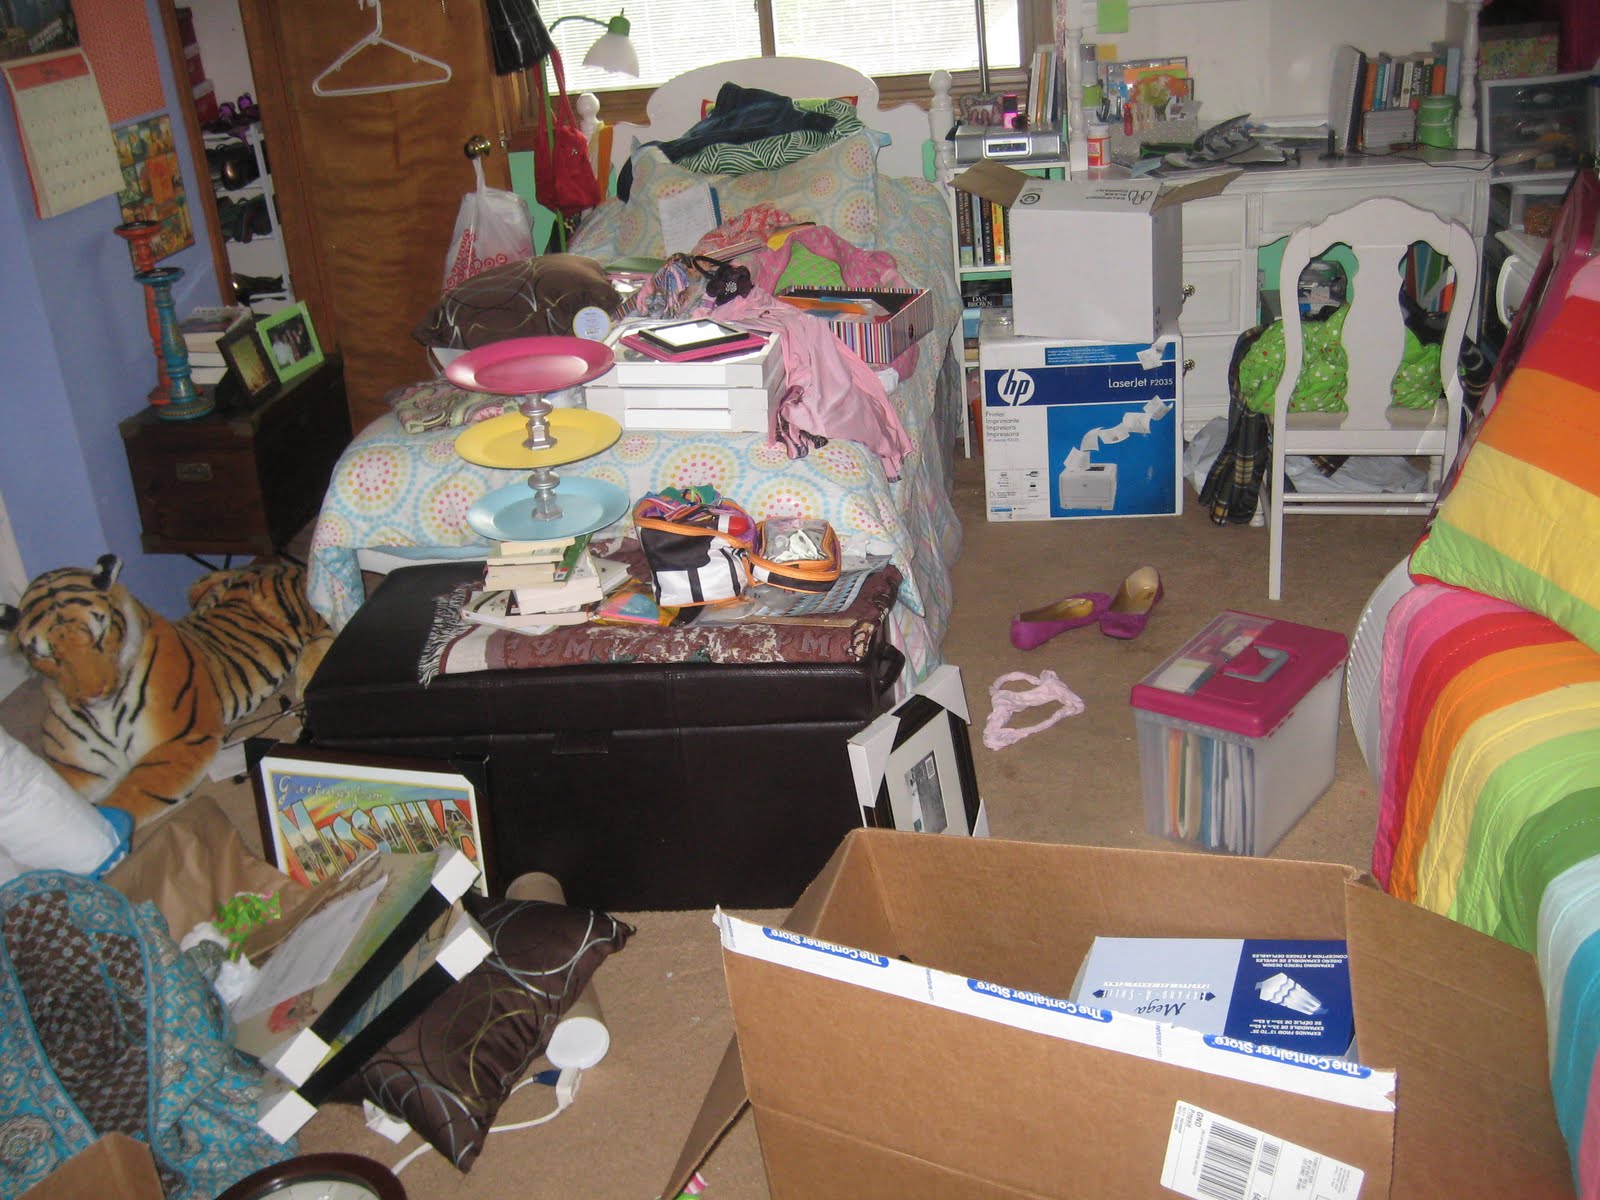
...okay, so not for most people, like my friends Asian or Whitney, who have both blogged about their dislike for the time-consuming task. As you should all know from reading my blog (and I know, you read it each and every day, treasuring my words...ha! Sarcasm) I am moving in 1 short week to Montana. I started packing a while ago, but I've really kicked it into overdrive now. Anyone who knows me/has seen my room also knows that I have a lot of stuff. Any sane person would be overwhelmed and extremely stressed by packing...but as my blog title implies, I really like it! It's sort of like a puzzle for me, getting everything to go nice and neat into my boxes...so, since I love it and it seems like others don't, I thought I'd share my top 10 tips for successful (and yes, FUN!, packing!)

1. If you're preparing for a big move or long trip, start packing early. One of the things that people seem to hate most about packing is that it takes a long time. If you start early enough and give yourself the time you need for those long vacations (study abroad) or big moves, you will enjoy it more because it won't seem like it's consuming your life. Do a bit each night before bed, and when you finish one box or bag, move it into the closet or garage or wherever, so that the boxes aren't overflowing in your room.

2. Make a list and check it thrice! I'm a big fan of lists...first of all, they make me feel like I'm more in control of my crap, and they also ensure that things won't be forgotten. I have one of these "Pack This!" notepads and I love using it whenever I pack, whether it's for a cross-country move or a weekend vacation. I usually make a hash like this / across the checkbox to indicate that I need to pack an item; once it's packed, I complete the x with another hash \ and I know it's taken care of! And having a record of what you packed is important if a box goes missing or you really can't find an item.

3. Attempt to group your stuff into categories...but don't be afraid to throw in some random things to round out the box. Having your like items grouped together makes for easy unpacking and also makes you feel accomplished (i.e. "Look, Ryan! I have been packing! I packed away all of my DVDs, see???") But don't waste space by calling a box done just because all of the like items are already packed. If there's empty space, find another item to fit it and make note of the unalike item on top of the box (i.e. "Shoes and wooden candlestick holder").

4. Always check box heaviness during and after you're done filling it. Nothing sucks more than finally figuring out how to best pack your box...and then realizing there's no way any human being could lift it. This happened to me during my packing process, and I wish I had done periodic weight checks as I added more stuff to the big ol' box. Moving and unpacking are pains enough...why add any extra strain to your back?

5. Pack heavy things, like dishes or books, in smaller boxes. This is another easy way to prevent boxes from weighing too much.

6. Before packing, weed through your stuff and host a garage sale! Anything that doesn't sell should go to charity. If you haven't worn the clothing or used the item in over 6 months, ask yourself if you will realistically use it when you move. Probably not, and the less clutter you have during the move, the less stressful it will be. Plus, you might get some extra cash (or, if the stuff doesn't sell, you can create an itemized list and get money off of your taxes!) Even if you do use the item but you don't like the style anymore (like an old laundry hamper from your college days -- you might want a more adult version now), you can always get rid of it and purchase a new one once you've moved!

7. Don't be afraid to get creative. Wrap your breakable dishes in clothing rather than bubble wrap -- if you're taking both, might as well combine them to save space! Or, if you have lots of large baskets or bins to organize things in, pack inside of those containers -- you won't waste a box, and you'll be able to clearly see what's packed, leaving for easier unpacking! Using containers you already have as packing boxes makes for insta-storage; for example, last time I moved into my sorority house, I packed my purses in underbed storage bins, which I slid under the bed for permanent storage!

8. Labels, labels, labels: rude when you put them on people, essential when you're packing to move! As an avid list-maker, I am also a fan of labels. [Not as much as my mother, who has taken to labeling the light switches...really, mom?!]
Friends and family who are so kindly helping you haul your stuff will need aid when it comes time to set the boxes down -- so help 'em out by writing "KITCHEN" or "BEDROOM" or wherever. Jot down a more precise listing of what's inside ("silverware" or "board games") so that you know what boxes house essentials and should be unpacked first. [Speaking of unpacking...I'll probably post tips for that later, too!]

9. Whenever possible, condense! Sometimes, you might have a large group of items already stored away. Though it might seem convenient just to pull it all out and take the full container with you, stop to consider if you'll really use it all. For example, I'm a big fan of hitting up after-Christmas wrapping paper sales, and I also store old bags given to me with gifts, so I have a ton of wrapping paper that I'd already stashed under my bed. Since I want to have the paper with me this holiday season, I grabbed the two underbed boxes to take with me. I could've taken both, but realized that condensing my favorite materials into one bin would save space -- plus would eliminate the headache of carrying an unneeded box up 3 flights of stairs, and would make it easier for me to find the good bags and paper later. So instead of grabbing all your already-stored DVDs, games, or whatever, actually sort through the collections and be realistic about what you'll need.

10. Make it fun! Don't just stand there staring at the daunting task ahead of you -- have a movie marathon, listen to some music and dance as you pack, or, my personal fave, make packing into a game or challenge. My sister and I used to challenge each other before family trips -- we'd race to see who could finish packing first! Even if you have no one to challenge, challenge yourself: set a timer and try and finish packing one group of items within a certain time limit. Also, don't sequester yourself in your room. The one thing I hate about packing is that it separates me from loved ones -- and when you're moving, you want to be around them as much as possible! To combat this, I bring boxes and possessions down to the family room and I pack in their presence. Just that simple step makes me happier. I strongly believe that if you go into things with a positive attitude, you're more likely to have fun. Make a fun environment for packing, and you should have a good time!


Pin It!

Tuesday, July 27, 2010

Lazy days at the Lake!

Last week, my sister, brother-in-law, fiance and I took a week off and headed to the lake! I can't speak for them, but I know that it was just what I needed -- time to relax and clear my head before throwing myself back into packing and gearing up for the big move.

The last time we were down at the lake (Labor Day with Ryan's parents -- woo hoo, the in-laws get along!) Ryan started this intense 2,000 piece coke puzzle. He got some large chunks done but had to pack it up when the weekend was over. So last week he pulled it out and started it over...

And with some help...

He completely finished it!

The decor at the lake actually used to be all coke-themed, and Megan and I are quite nostalgic about that, so we decided once we inherit the house we're going to bring that back. Which meant we wanted to keep the ginormous coke puzzle together to hang up. Which meant we needed to find a ginormous frame to put it in. Well, here's the beauty:

Ha, I know, it is hideous and so is the ooooooglay mountain picture inside. But we trolled Wal-Mart to no avail, and as a frequent Michael's shopper, I know that they don't stock a 42" x 36" frame. We'd have to have a custom frame made, which would be really expensive. So imagine our happiness when we found this speckled poster frame in a little furniture consignment store on the way back from the outlet malls! Ryan spotted it hidden in a corner and we snagged it for only $40, which was good considering a custom frame that size would be $50+. We plan on spray-painting it later, but for now, here's the final-ish product.


Since my sis and I are big thrift store shoppers, we decided to stop at another thrift store in Osage Beach. It was such a cool place! The shelves were brimming with things to look at, and we both found some adorable things.

I got a retro camera that would look really cool on the bookshelf that I'm eyein' for our living room.


In addition to the cool camera, I also got a fun slanty vase:


...and began my love affair with Fiestaware.


There was a shelf full of the bright, beautiful dishware in the store. I was drawn to the turquoise right away (which is no surprise, since my kitchen has a lot of the bright blue in it!) I ended up getting a large mixing bowl (or, as Ryan thinks it should be, a "mashed potato bowl" -- hahaha) and a spoon rest, both for much cheaper than I've seen online. Though I love the dish sets, I think I'll probably just stick to getting accent pieces like these (I'm eyeing the persimmon teapot and pitcher for my next purchases -- or Christmas gift lists) rather than all of the plates and bowls.

Of course we also hit up the Outlet Malls for some shopping -- both the fiance and I got some discounted new garb at Gap, and we got a few utensil essentials at the Kitchen Collection. But shopping wasn't the highlight of the trip -- we had so much fun relaxing in the water and enjoying the outdoors!


And we spent a lot of quality time together:


We also had some delicious home-cooked meals, like chicken tenders:

Crab cakes and salmon:


Mexican fiesta food:


On our last night, we went out for seafood -- but found out that the place we wanted to go to was no longer in business. We decided to drive back to Osage Beach and eat at the Pasta Factory. In the end, it was very fortuitous: after dinner, we went next door to Home Depot for electrical parts to fix the dock lighting, and there we found a rug on a super-duper good sale! I bought it for Megan and Brandon as an anniversary gift.

Here it is all rolled out at their home, after we made our way back to LS:


All in all, it was a fabulous time with fabulous people at my favorite lake spot :)

Check back later this week for more updates on some crafty projects and my packing progress!


Pin It!

Thursday, July 22, 2010

Dollar Store Craft #3: Bulletin Board Center

This post marks the last of my Dollar Store Craft imitations -- but I did find some steals of my own and of course added my crafty touch to the materials. Posts on these projects will be coming soon!

Back to the present...another Dollar Store Craft I absolutely adored was the bulletin board center by Joanne.


I'd already been eying the uber-organized memo center from Pottery Barn, but it is waaaaay out of my budget.


So, after seeing Joanne's idea and snagging the bulletin boards from Dollar Tree, I decided to really mimic the look of the pricey Pottery Barn centers. Thus, I did not emulate the ribbon connecting Joanne's boards, and I painted the wooden frames of the boards black. (Side note: at first I used ordinary acrylic craft paint for this job, but it wasn't covering at all.

Then I turned to my new BFF, Valspar spray paint in flat black, and it worked its magic!)


Best of all, the paint didn't seep through the magazine clippings/tape I used to cover the cork!


I also added a step that Joanne didn't mention: gluing cardboard behind the cork. Since these are dollar store bulletin boards, the cork is very thin and backed with a thin layer of cardboard. Adding the extra layer (which I cut out from a strawberry box, haha) ensures that the pushpin or tack won't stick out and injure the wall or your fingers!)


Check them out below in action with the other message boards I already owned. The monthly dry erase calendar was a gift card purchase from Target, and the photo clip frame was a birthday gift from Pier One!

I think they turned out well! My brother-in-law actually thought that they were picture frames, which got me thinking that if you had something to frame, you could remove the cork/cardboard and place the art inside -- instant display!

So, is my low-budget DIY comparable to the PB inspiration? Let me know what you think!


Pin It!

Wednesday, July 21, 2010

Dollar Store Craft #2: Double Display Frame

Anyone who has been in my room knows that I love to have tons of photos displayed in my space. I love taking pictures and remembering the events they commemorate. So when I saw the Double display frame by Blue Artichoke Interiors featured on Dollar Store Crafts, I wanted to mimic the project right away. Here's their version:


And here's the important info:

Supplies:
  • Assorted frames from your local dollar store (I opted for two square 8 x 8 frames, one 5 x 7 frame, two4 x 6 frames, and one 3 x 3 frame)
  • Spray paint (on hand or at craft/hardware store)
  • Scrapbook paper for matting (on hand or at craft store)
  • Stick-on velcro (I just used 3M command strips because I had them handy)
Instructions:
  1. Take glass and backing out of frames and spray paint in desired colors! (Don't forget my Pizza Box paint station idea from last post). For my project, I chose to paint one 8 x 8 pink (leftover from my tiered tray project), and one chrome (again from the tray project). [Sidebar: The first go-round, I bought a tiny frame -- wallet-sized -- to paint blue and put with the pink 8 x 8 frame. After the paint completely covered the thing, I thought spray-painting it with clear enamel was a good idea. NOT. Apparently, Krylon spray paint + Clear spray enamel = wrinkly uglies on the previously perfect paint job! I say skip the enamel...the paint will be glossy enough on its own. This mistake led me to make some alterations on the project...see below!]
  2. While waiting for the paint to dry, measure and cut out scrapbook paper for the larger frames. The paper acts as the matting, like the burlap fabric in the inspiration project.
  3. When the paint is dry, insert the scrapbook paper into the large frames. Do not place the glass in the larger frames, as you will be adhering the smaller frames to the surface of the scrapbook paper matting.
  4. Apply the stick-on velcro to the scrapbook matting and the back of the smaller frames. Stick on the frame and PRESTO! You have a double matted frame, which looks much more sophisticated than a dollar store buy! [Sidebar: The original project called for the smaller frame to be glued onto the scrapbook matting, but I decided to use stick-on velcro instead of glue, so that the pictures could be easily changed out!]
And here are my snaps of my final products:


The pink frame is intended for my desk, which is large and black and could use pops of color. [I have other dollar store projects that will accomplish this task..but more on them later!] I used the floral paper and bright paint to tie-in with the scrapbook quilt that I crafted for the office. The other frames don't have an official home yet, so I kept the colors fairly neutral.

Also note that the pink frame with the floral paper is not a double display frame...that was the one I intended to use with the blue Krylon paint/enamel victim. I ended up ruining the frame with the enamel, so I decided to use scrapbook paper to create my own lime green matting, because I couldn't find another wallet-sized or square frame at the dollar store to fit my liking. In the future, if I see a little guy I'll snag him to paint lime green -- but for now the paper works just fine as a 2-D frame :) Of course, I wanted a blue frame still, so I took this old oooglay gold frame and spray-painted it with the pretty Krylon color....for after pictures, you will have to check back later this week!


So, what's the verdict? Do my versions match up to the original?


Pin It!

Monday, July 19, 2010

Dollar Store Craft #1: Colorful Tiered Trays

As I mentioned in my last post, I am a big fan of the amazing website Dollar Store Crafts. What's not to love? DIY low-budget decor? I am so in! So I chose my top 5 favorite projects featured on their website, and decided to recreate 3 of them. Here's the first, with lots of in-progress photos and helpful tips:

Colorful tiered trays by Julie [Joy's Hope]


I love the colors featured in this picture, and thought they would match perfectly with my kitchen and dining room decor, so I wanted to mimic them in my project; however, I couldn't find a good lime green spray paint color, so I went with a chrome instead and used that color on the candlesticks that join the plates together. Also, since I have more of a modern style, I tweaked Joy's project by choosing decorative plates with a bubble pattern on the outside ring rather than the more shabby chic metal trays that she used.

Overall, the process was very simple and the supplies were low-cost!

Supplies:
  • 3 decorative plastic trays or plates
  • 2 crystal candleholders (long enough to provide enough space between the trays -- I found some shorter candlesticks that came in packs of 2 and glued these together to form a longer one)
  • Spray paint (my new fave is Valspar -- check my tips #1 and 2 below for tips on buying spraypaint and repurposing old pizza boxes when painting!)
  • Glue (I used E3600 and Krazy Glue... see my tip #3 below for more info)
Instructions:

1. Prepare well-ventilated area for painting and spray away!

Awesome Tip #1: Next time you order from your favorite pizzeria, stash the empty box for future uses as a makeshift painting station. Just grab the crumb-free box (important -- shake it out first so that crust doesn't stick to your paint!) and place the item to be painted in it. Then you can tote the box around easily. For example, I like to paint outside, since any residue is quickly mowed away, so I placed the plates in their boxes, painted outside, and then carried the boxes into the garage for the plates to dry. Super easy!

Awesome Tip #2: I decided to try Valspar's chrome "odds and ends" spray paint for the candlesticks. I love this paint! It covered the candlesticks in one coat, and at $1.99 a pop, it was also affordable. I highly recommend it! I loved the shade so much that I decided to use it on my previously orange lamps, which I had painted weeks before but wasn't quite happy with...but I'll be posting later on the lamp redo.

2. Once you're satisfied with your painted baubles (the number of coats you have to do will depend on the shade/type of paint you select) and they're completely dry, it's gluing time! First, glue one candlestick to the bottom of the top plate. Flip the plate upside down and set a book on the candlestick to help the glue work its magic. Then, glue the other candlestick to the top of the bottom plate and again use a heavy book to help the glue set. Repeat the glue and book step by adding the middle plate to the mix: glue the top plate/candlestick conglomeration to the top of the middle plate, then glue to bottom plate/candlestick to the bottom of the middle plate.

I used a combo of E3600 and Krazy Glue for this task. Why, you may ask? Well, that leads into Awesome Tip #3! which is less of a tip and more of a me admitting my mistakes. I had never used E3600 before, so of course I slathered too much onto one of the chrome candlesticks. When the goopy glue met the silvery sheen, a messy chrome ooze resulted. Sadly, you can see the aftershocks of the mistake on the middle plate:


But, since the plate will be covered with stuff, it doesn't bug me too much! So the tip: be careful with your E3600 application, or just stick with Krazy Glue!

3. Let the trays sit overnight and then enjoy your beautiful creation!

Without further ado, a picture of my final result!


Since these colors fit so well with my kitchen, I am planning on using my trays as a "tea station" where I can store tea bags, sweeteners, creamers, and coffees! I staged this picture in my parents' kitchen, since I don't have one yet...but you get the idea!


I am also very tempted to make another one for sorting mail: one tier could hold bills, one cards/postcards, and the other catalogs/magazines...or I could do one for incoming, one for outgoing, and one for postage and stationery. I might wait until post-move to make this one, or I might go ahead and do it soon...time will tell!

Well, what do you think of dollar store craft recreation #1? Stay tuned for more!


Pin It!

Sunday, July 18, 2010

Craft Corner: Dollar store creations!

My fabulous sister recently introduced me to a blog that I now love, Dollar Store Crafts! The website features the projects of tons of bloggers who take cheap dollar store finds and transform them into amazing "no-way-that-only-cost-that-much" creations!

Of course, after browsing the site and picking my favorites, I just had to give some them a go. I'm going to unveil my finished projects over this week. Here are my Top Five favorites -- I'm attempting the first 3 and saving the last 2 for later, if we have some bare walls that need some extra somethin' somethin' once we've set up the apartment!

Craft no. 1
: Colorful tiered trays by Julie [Joy's Hope]


As you can probably tell from my kitchen and dining room decor, I am a fan of bright colors! Thus, when I saw these bright-hued beauties, I knew right away that I wanted to attempt my own. Check back in soon to see my version!

Craft no. 2: Double display frame by Blue Artichoke Interiors


I am not a doggy owner (though I love pups!), so my desire to copycat this project does not have to do with the canine theme, but rather with the layered look of the frame! I love having lots of pictures around me that document my favorite moments and loved ones -- and especially since we're moving so far away, Ryan and I will really want those familiar faces and memories with us. Look later this week for my creations.


Craft no. 3: Bulletin board center by Joanne


As you can see from this wishlist post, I absolutely love the look of a repetitious, symmetrical message board center. When I saw Joanne's project, my heart was aflutter! Although I made some changes with paint and a little hot glue, Joanne's board collection really inspired me. If you want to see my version, keep an eye out over this week :)

Craft no. 4: DIY Necklace holder by Wendy [see her Etsy store!]


I hate, hate, hate tangled jewelry but love, love, love scrapbook paper and cutesy decorative knobs, so of course I fell in love with this idea! Thought I was itching to make this ASAP, I realized that I should wait until we move and put together our apartment -- that way, I can see if I actually need this instead of just wanting it. But, as I said above, if I have a lonely wall in the bedroom, maybe I can make this later! If I am to craft it later, I would make my version a bit brighter, however, by choosing more colorful paper to put in the picture frame (yeah, that's what this is made of) and colored knobs (half off at Hobby Lobby!) to boot.

Craft no. 5: Starburst mirror by Heather [creator of Dollar Store Crafts!]


When I saw that this project cost Heather only $8.95, I was in disbelief. It looks so stunning and sophisticated! I've seen look-alikes for way more, from $69.99 at Target to a whopping $503.80 at Lumens.com. I have always loved this style and think it might look good in the bedroom or bathroom. But since I can't be sure that we'll have wall space until we're all set up in Montana, I decided to wait and potentially tackle this project later!

What do you think of my copycat/favorite projects? Inspired to craft anything yourself? Check out Dollar Store Crafts and let me know which creations inspire you!


Pin It!

Thursday, July 15, 2010

Organization overload

In terms of organizing, last week was all kinds of productive. The fiance and I tackled his closet by literally tossing his clothes off the landing. This pile of clothing on the stairs resulted:Yeah, that's actually half of it. He hasn't gotten rid of any clothing in a loooong time. We sorted the keepsake clothes (boy scout gear, favorite shirts from high school, etc.), give aways, throw aways, and the wearables. We found some real gems in there, let me tell you…I wish I had pictures of some things! These piles resulted:

Keepers:


Give-aways!


We also conquered a major, major mess: his cables. In case you don’t know, my fiancĂ© is a big computer/technology geek. The result? Tons and tons of wires, cables, plugs, and other tidbits that pile up. He used to have them all corralled in a camp box, but that was just not working. They kept getting tangled and it was impossible to find the right wire when he needed it. It looked a little like this but ten times worse:


The solution? I snagged these 6-quart Room Essentials shoe boxes from Target.


The damage? A measly $5 for 5 boxes! Awesome, especially since all the comparable storage options were $5 a piece and up! We sorted his various cords and components into categories, made labels accordingly, and presto -- fabulous techno storage for cheaps! The bins are very stackable, so I know these will be great on the shelves in our office closet. These bins don't yet have the cables in them, but you get the idea:


This week's other major organizing project was undertaken with my amazing sister Megan! After I purchased an awesome behind-the-sofa (or futon, in our case) table from craigslist for only $30, we had to shift around some other furniture and find a home for some cardboard recycling. Since the garage was pretty horrifyingly ugly before (and we were so focused on cleaning the place out quick) we did not take before pictures, but this is a bit comparable:


Now, the space is muuuch better! The furniture is all placed so that everything is easy to get out if I need it.

All in all, I feel accomplished knowing that Ryan's unsightly coils of tangled cords are no more, and that I can easily add or take away stuff from my growing moving pile in the garage! I'm sure as we move more organizational challenges will come my way...and I'll try to tackle them and share the solutions!


Pin It!

Pin It button on image hover