


Last week I shared an easy DIY project I plan to add to our wedding wall--a pinwheel canvas. Now I'm back to share another way to commemorate our big day: a shadow box! This is a simple project that you can customize to celebrate any event--a milestone birthday, your child's birth, a vacation, etc.

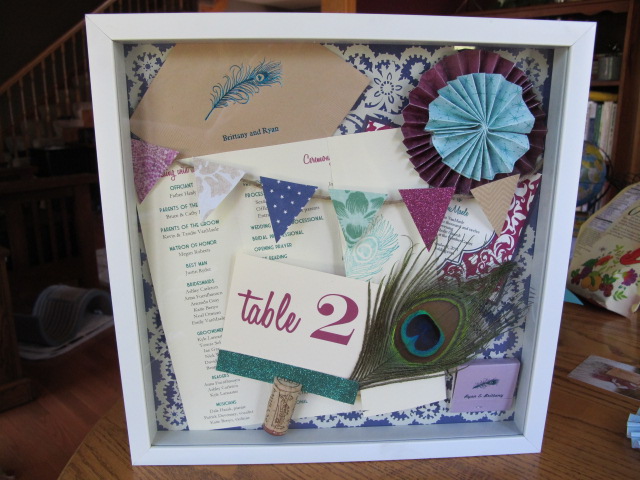
First, I collected my supplies: more pinwheels from my wedding, our program, a table number from the reception, one of our personalized napkins and matchbooks, our invitation, some mini bunting that we used to deck out our card basket, a "pop quiz" we had each guest fill out, and the paper and vellum overlay we used for our centerpieces, as well as a 12x12 white shadowbox from Target. I didn't end up using all of these things in the box, but wanted to collect many items so that I could play around with arranging things.

Then, just as with the pinwheel canvas, I played around with my objects until I'd settled on an arrangement I liked. I snapped a picture to help me reassemble it:

I decided to go with the dark purple paper with the lace vellum overlay because the other elements in the box really brought out more of our other colors (sangria and jade).

To attach the paper to the back of the shadowbox, I just used rolled bits of tape and applied 5 pieces--one in the center and one in each of the corners. I pressed firmly for around a minute to ensure that the paper would stay put. Some of my 3D items in the box, like the cork and the stacked pinwheels, will also keep the backing in place. Then I taped the lace overlay (from Michael's) to the paper. I just used a few pieces in the middle of the sheet since they'd be covered up by my program.


Then I proceeded by taping on the bottom layer of items first: the napkin, our invitation, the program (which I left half-splayed open to display our wedding party and the pretty peacock feather stamp on the outside), and the layered pinwheels.

I placed the napkin at the upper edge of the box, so I had to wrap the top of it and tape it to the outside of the backing like so:

Next came the matchbook and the table number. I was a little worried about attaching the cork topper--I thought I might need to use a little hot glue--but tape worked just fine! If it ever comes off, I'll just use a dab of glue :) At our wedding, the table numbers were stuck in dark bluish-purple wine bottles that had the menus pasted to them--it was super cute! The mini bunting finished things off.

Then I just popped the backing into the shadowbox, and voilà! Another pretty way to display some of our wedding mementos.
For now it looks great next to the pinwheel canvas, but I'm itching to see how it'll be nestled in on the gallery wall. Now I only need to complete one more DIY and add a few honeymoon pictures, and the wall will be complete!
I love this idea! It's a great way to save your memorabilia from your special day.
ReplyDeleteI love how colorful your shadow box is! I just pinned it :)
ReplyDelete